I thought it might be nice to show how I make up my fabric labels for the garments I make. I'll warn you ahead of time; this will be very picture intensive. LOL. I'm not going to get into the software aspect of creating a design; that can be a lesson for another time. But this tute will show how the label gets setup and embroidered.
These labels are the finished product and what we hope to achieve by the end of this tutorial.
To start, you need a design file and a printout of your design file with the cross hatches marked on it such as the one below.
This is quite a small design; mine is 1.65" tall X 2.85" wide. I've cut out around it so I can easily use it to mark the starting points on my ribbon.
Using a 5X7 hoop, place a piece of Floriani Wet N Gone Tacky, paper side up, in the hoop. Using the end of a pair of scissors, lightly trace all the way around the hoop taking care not to cut through the tacky second layer. Pull the protective paper layer away and set aside or discard.
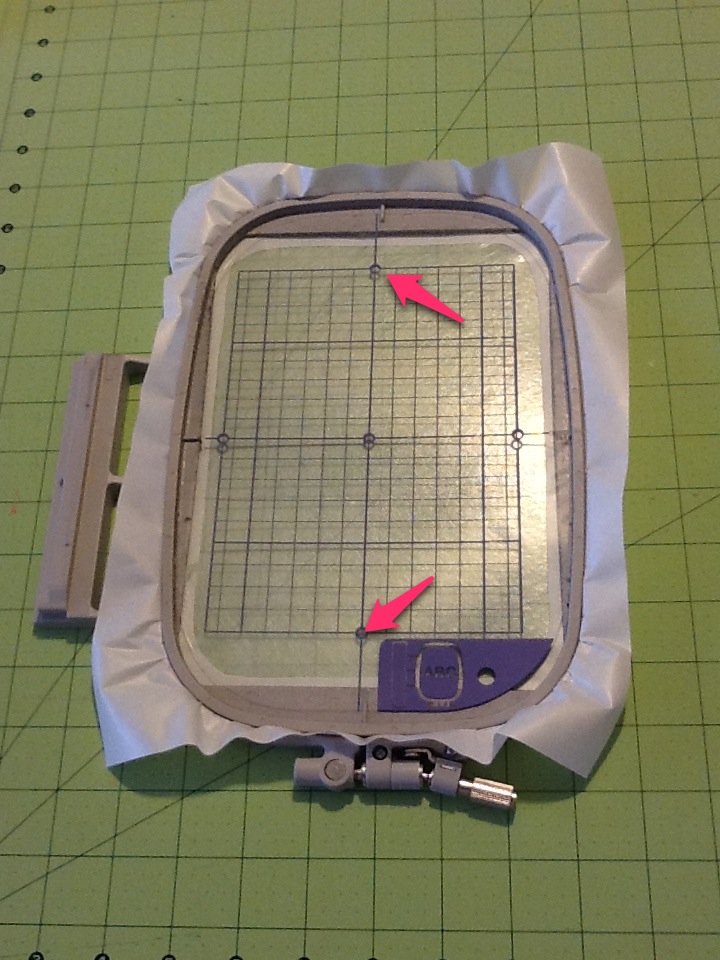
Place the template that came with your hoop to mark the top-most and bottom embroiderable area in the hoop (indicated by the pink arrows). Just a tiny black mark you can see will be good enough.
Now you have to cut 3 pieces of grosgrain ribbon to place in the hoop. This picture above shows 2 1/4" ribbon. You can find it anywhere. I prefer 2 inch but that's all I could find on that day. I have several colors, white, black, pink, gray, lilac, etc. Today we're using white. I cut my ribbon about 6 inches long (that's as wide as the inside of the hoop).
Using your cutting matt, like the one you see above, you can arrange your hoop on the lines of the matt, which helps you lay the ribbon on the sticky paper of the hoop. Like this:
As you can see, I didn't measure too well for this shot. LOL. If you look at my hoop, you'll see I was able to fit all 3 pieces of ribbon in the area you can embroider.
Using that little template of your design, center it on your ribbon and mark a dot at the center. Too make that a little easier to do, I put a straight pin through the center to create a tiny hole. Then I use an iron away marker to make the dot I need to center my needle. I know it's a bit hard to see but if you click on the picture, you'll see the dots I've marked on each ribbon to mark the center of my design.
Load your hoop onto your machine. Load the design. Now you'll want to place (or float) a piece of light tearaway stabilizer under the hoop. Once you have your design ready, touch the mini sewing machine (highlighted in blue on the bottom of the screen) with a magnifying glass and you can see a close-up of where your needle is. Make any adjustments you deem necessary to sew the design. Hit close and then the start button.
Here I've started the first label. As a side note, you might want to keep the number of color changes down to keep from having to change thread colors so much. Remember we aren't talking software here just the actual embroidery. My design has 3 colors. It's personal choice really. So finish embroidering all 3 labels in the hoop.
TaDa!!
Now you will remove the completed design from the hoop and tear out the tearaway stabilizer. Try to get rid of as much as you can.
Then using a pair of scissors, cut each ribbon out of the sticky
stabilizer. You will then run some hot water in a sink and soak/rub the
rest of the sticky stabilizer away. Look at it under a light while
doing it, because it will turn into gel-like strings. You want to get
as much of that off because on darker ribbons it will show up if left on to dry.
Take your wet ribbons and put them into a towel and roll them up. Press on them with your hands until they are damp dry. Then using an old press cloth press them until they are completely dry.
Then you have pretty labels to use on quilts, garments, etc. Trim the edges to where you'd like them to be, fold them under and sew them down or you can sew them down when you put them on a garment. I've also created a smaller version of my design that will work on 1 inch grosgrain ribbon too.
I used a bit of fabric glue to hold it into place while I sewed it down. But you can see it's a nice application.
Well I hope you enjoyed seeing how I create my labels and I hope you may have learned something new. Let me know what you think. I really enjoy reading your comments.
Later!


Belinda, thanks so much for this tutorial - you know when you get that Eureka moment, well reading your tutorial gave me just that. For some reason, don't ask me why, it didn't occur to me to embroider my logo on some grosgrain ribbon - I will buys some tomorrow - Thank you
ReplyDeleteYour welcome and I think you will love how they turn out.
DeleteThanks for sharing Belinda. Great tutorial!
ReplyDeleteI can't wait to work together on some projects and to learn the multiple hooping techniques. Your work is wonderful and so is your teaching :) I have seen Judi's top and it looks awesome. She is so excited with all she is learning.
Thank you Andrea! You'll just have to hurry back from your retreat! I can't wait to hear about it.
DeleteJust to let you know I bought my ribbon, and did it and they did turn out so well. Thanks again.
ReplyDeleteGreat! Any pics of them on your blog?
Deletenope not yet, but I will refer everyone to your blog when I do (if you don't mind)- just trying to finish off Mike's 2nd shirt but its getting late - came down for an eye break.
ReplyDeleteNo, no problem at all. I can't wait to see what you've done for Mike. You do beautiful work. I should probably get off my duff and make something for Alan. A tee shirt won't hold him very long.
DeleteWhile all of us would be aware in a general way what MMA Gear is, many of us might be surprised at the kinds of fight wear that falls under this category.get code
ReplyDelete