Wednesday, September 29, 2010
I'm in Iron Hell...
I don't what I must have done in a past life, but I need yet ANOTHER new iron. Ugh. I had a Rowenta Advancer ( hated the automatic shut off ) but dropped it one time too many. Now I have a Rowenta Focus. Its been fine for about 8 months and now the tank is leaking up towards the front ( whether I use steam or not ). That makes 3 irons in 3 years. I'm afraid to use it on whites now. I swear I haven't dropped it once. Really. LOL. So I begin the search for a new one. GAH. I think I may have to graduate to a new system.
Wednesday, September 22, 2010
Candlewick & Roses...Done!!!

Well...it took me a couple of days to finish the buttons and buttonholes. Did the buttonholes first. Btw, did I ever say I always embroider my buttonholes now? Oh gads! Its sew much easier! Then I marked the corresponding locations for the buttons. Don't you hate it when you purchase a great blouse and then it gapes in the front? Grrrrr. Ever since I started noticing that happening, I've been moving the dang locations for buttons. Now no more gaping.
This really is a great pattern. I can see myself making this several times before getting bored with it.
Each button has a rose bud hand embroidered into it. I thought adding this bit of hand embroidery made it touch more feminine without going over the top. I really hate phoofy. Is that even a word? LOL.
Tuesday, September 21, 2010
Candlewick & Roses

I've added the collar and sleeves with the embroidered cuffs. Cute, cute, cute.
Here's a picture of the shirt so far. You can click on it for a closer view.

Sunday, September 19, 2010
Take a break with an Angel...

Thursday, September 16, 2010
Candlewick...

And yes I've made it in white, but its a really lovely fine herringbone weave 100% cotton shirting I found with our lovely ladies at the Cloth Merchants. These ladies provide us with our only local outlet to finer fabrics. Here in Tulsa, we're pretty limited in fabric availability. I'm very lucky I'm not totally stuck with just JoAnn's and Hancock Fabrics.
I'm sorry the picture of the pattern isn't better. I had to pull it from Simplicity; everytime I tried to take a picture of my pattern, the shiny paper they used totally flashed out with my camera. And I don't know enough about the dang camera to turn the flash off. But you can at least get the idea with what I've shown.
Okay...right off the bat, I've made a few modifications to the pattern. The view I choose ends at the high hip. I added two inches for a mid hip length. Also, I don't like any of the cuff variations shown in the pattern; I prefer a regular cuff. So I borrowed one from another pattern. LOL. This particular pattern has included different pieces for each cup sizes. So I selected View A size C. I've also decided to embellish the bib & cuffs with embroidery. So I shopped my extensive embroidery design collection ( I'm addicted) for something appropriate and settled on a set of candlewick designs I got locally at a quilting shop that sells Pfaff machines and designs.

I know its a little hard to see, but if you click on it, you'll get a larger picture hopefully be able to get a good idea of the look of the design. Here is a sew out of the design I chose. Actually, its the design repeated twice, one right next to the other. I love subtle, white on white, etc. This piece is going to be a cuff. I did what I normally do when adding embroidery to a project. I take the pattern piece and make an outline of it with wash away blue pen and cut it out with enough fabric around to fit in the hoop. Except, I almost never hoop anything. I hooped sticky wash away stabilizer in the hoop and positioned the fabric on the hoop. Embroidered the first design. Removed it from the hoop. Cut off the excess stabilizer (keeping the leftover pieces for odd small designs). Hoop another piece of the same stabilizer and with the use of a printed copy of the design, positioned it on the sticky. Embroidered the second iteration of the design. In this fashion, I made embroidered fabric for the 2 front bib pieces and 2 cuffs.
So far, I've got the darts sewn, fronts contructed, fronts attached to the back and a very narrow hem. Here's a closeup of the bib.

And here's a side view.

Wednesday, September 15, 2010
Lacy table scarf...Juliet

I made 4 of one design and 3 of the second. I did all of the work on my Ellisimo. The hardest part of the process was picking the colors I liked that would look nice in my Dining Room. Its a combination of lace making and applique'. The design size is about 6X6 was sewn on 2 pieces of wash away stablizer. The outside border is embroidered out with rayon on the top and in the bobbin. Then I changed out the bobbin for a white prewound bobbin. The next process involved placing a scrap piece of linen down on top of the wash away and letting the design tack it down. Trim the excess fabric away and then just embroider the rest of the design. Repeat making the design as many times as you need to produce the size scarf you want.

This little scarf is going to live on my sideboard. I had to take the pics of it on the table though, just so I would have enough light. I just love how it turned out.
Thursday, September 9, 2010
Embroidered Table Cloth
 I'm working on reviewing a shirt but I thought I might post the embroidered tablecloth I made for the dining room early this summer. Its just out of 100% fireproof polyester fabric you can get from Hancock Fabrics for $7 a yard. I was trying to find a fabric that I could embroider with a backing that would wash out since the white fabric was fairly see through. Its pretty easy to care for - just wash and lightly press the designs from the back.
 I used a built-in decorative stitch from my Ellegante' to cover the hem stitching. The embroidery is heirloom designs from Elsa designs www.elsasdesigns.com. The initial in the design is called Chocolate Punch and is from Annaboveembroidery.com. She has tons of really cool fonts and initials of which I have way too many. LOL.
Here's a pic of the side view design without an initial.

Cover Stitch fear...
I purchased Babylock CV (cover stitch) machine about 6 months ago and besides playing with it a little, I haven't used it at all. Went to Debbie Cook's blog www.stitchesandseams.blogspot.com for the great tips she has on cover stitching. That helped. LOL.
So now I'm digging through my stash for knits. I've found a couple of old (and when I say Old, I mean like 20 years old). One is a hot pink tie dye tee shirt knit I purchased when we still lived in Titusville (Florida). I think I was going to make a beach coverup out of it. I look at it now and wonder what was I thinking? HA! Its embarrassing. LOL. The other is ok. Mostly black with a tiny white and pink roses scattered all over it. It doesn't have a lot of stretch either. I'm looking at the pattern
So now I'm digging through my stash for knits. I've found a couple of old (and when I say Old, I mean like 20 years old). One is a hot pink tie dye tee shirt knit I purchased when we still lived in Titusville (Florida). I think I was going to make a beach coverup out of it. I look at it now and wonder what was I thinking? HA! Its embarrassing. LOL. The other is ok. Mostly black with a tiny white and pink roses scattered all over it. It doesn't have a lot of stretch either. I'm looking at the pattern
Wednesday, September 8, 2010
Matthew & the Army

I found out from my sister, Debbie, that Matthew has arrived in Afghanistan safely. This is his second tour and we don't know exactly where he's located. Apparently they are waiting on final orders and when that happens we'll get a location. Debbie misses him a lot. I keep checking his Facebook page and he's pretty bored with the waiting.
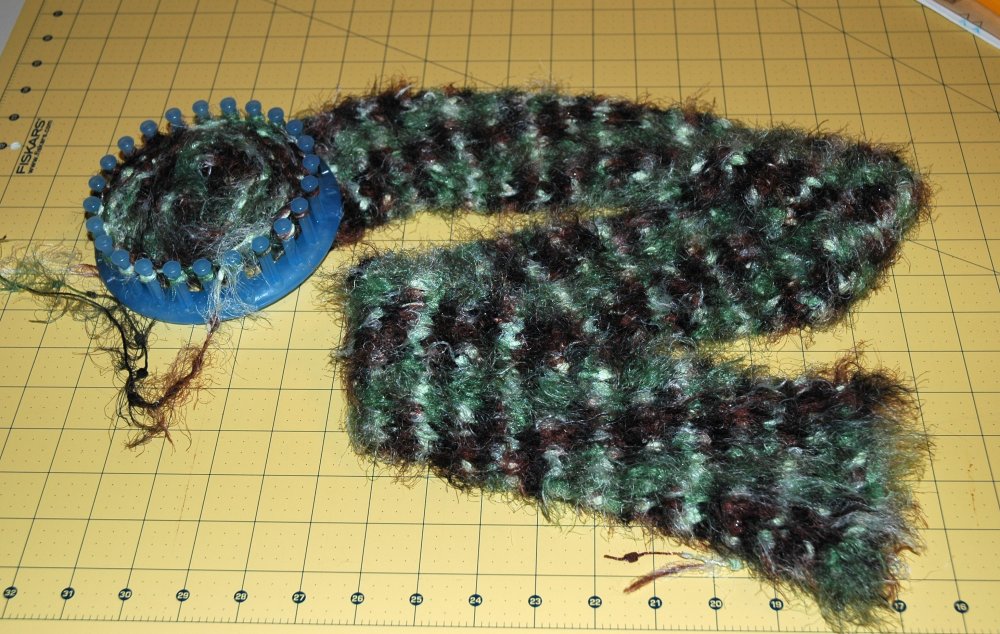
I'm going to be putting together a box of goodies to send to him. Right now I'm working on a knitted winter scarf for him when they go into the mountains. I found this really cool camouflage yarn and am almost done with it. I had to order another ball of the color since it was on sale and there wasn't quite enough to finish what I had in mind for him. It should be here any day now. I found a "knitting loom" and have been having a great time using it. Its easier for me to use than knitting needles. And more mindless. LOL. I'd been looking for something to do with my hands while I watch TV and now it looks like this is it. Its going to end up with a big pom pom on each end. Here's a picture of what I've done so far on Matthew's scarf. Even though the color is camo and its not something I've ever liked, I think this is nice. Oh, btw, I made this whole thing in one day.
Subscribe to:
Posts (Atom)