Friday, May 27, 2011

Blouse Progress...

Here's an update on the progress I've made.  The collar and band are in place.  I have added slightly longer than cap size sleeves.  I borrowed a sleeve from another pattern and played around with it until it was as long as I liked.  I have the hem pinned up but not sewn yet.  All I have left to do is buttonholes and buttons. 


And a closeup of the back shoulder embroidery.


It's been a fun blouse to make and I'll show finished pictures soon!

Later!

Thursday, May 26, 2011

Blueberries, Yummmmmm

Its been so nice outside we've been puttering around in the yard.  I don't think I've mentioned it before, but we grow blueberries in the back yard.  We have 9 bushes in 2 raised beds.  Yesterday, we installed the bird netting.  We had to get the netting up before they started ripening or the birds would drive us crazy.  This will be a banner year for berries.  If we can just make sure we don't have another bad hail storm, we should be good to go. 


Yummm!  I'm going to try making preserves this year and maybe even some blueberry syrup.  I'll start picking berries in just 2 or 3 weeks.

Enjoy!

Monday, May 23, 2011

Design Aspects...

How do you choose designs for an embroidery project?

When I starting thinking of a blouse, jacket or whatever, I start designing in my mind's eye first.  Sometimes I even wake up in the morning with a design aspect in mind.  Right now I'm on a kick where I make embroidered blouses with several different fabrics in the makeup.  LOL!

In my last post, I showed you the fabrics I'm using.  And here is one test sew-outs of potential designs I give a tryout on the fabric.   I made at least 4 or 5 test sew-outs; I won't bore you with all of them.  LOL.


As you can see, I was testing different colors and choose 2 colors to use on this blouse.  Madeira 1356 & 1235, the 2 pinks above.

I had to stage my embroidery on this blouse.  I like to cover as much as possible so the backing doesn't show.  Here is the first stage.  This was embroidered before it was cut out.  I forgot to take the picture showing it, so you're seeing it after the embroidery and being cut out of the fabric.  You have to remember, when doing a fairly large embroidery, you're fabric will shrink a bit.  So as much as possible, I try to embroider before cutting out. Below is the OUTSIDE yoke.


Next is the INSIDE yoke.  I've decided to try and embroider a label on the insides of garments.


 I know its subtle but that's the way I like it.  And anywho, who's going to see beside me?  LOL.

Next I sewed the yokes to the back and attached both fronts using the banana method which leaves you with a clean finish inside.  Here is a picture of the completed embroidery in the second stage.  I wanted to have the embroidery sort of drape over the left shoulder a bit to provide interest.  This embroidery crosses the shoulder seam.  I did not edgestitch the left shoulder seam.  I did edgestitch the right and the bottom of the yoke.


Now we have the third stage of the embroidery as it cascades across the back, just touching the yoke.


Its still in the hoop.  I'm adding just a touch of very tiny silver sequins ( 2mm) to each of the areas of embroidery.  The camera just doesn't pick them up very well so I'm not going to bother to try to get photos of it.  You'll have to use your imagination.  LOL!  Well, that's all for now.

Later...

Hail Storm...

Ugh, May really is a trying month for extreme weather here in Oklahoma.

A hail storm caught us totally off guard last night around 10:30pm.  I had to run to get my car into the garage so it wouldn't get damaged.  Here's a quick picture of a few pieces I collected.  As you can see, a couple of them are golf ball sized. 


Joplin, Missouri is only 1.5 hours away and I know it pretty well having attended lots of cat shows over the years.  They've had a terrible tornado hit and the town is a disaster area.  Please take a moment to keep these people in your thoughts.

Friday, May 20, 2011

Another one...

I know, I know, I'm really boring as a blogging goes by making yet another summer blouse.  LOL.  I'm on a roll!!!!  But I really need some new things for summer.  I did a really brave thing, for me, by donating everything in my closet that I don't wear to Prevent Blindness this past week.  I really cleaned out my closet.  It wound up being 2 large black garbage bags full.  Hence the need for new summer clothes. 

I did make a pair of capri's using an old Simplicity OOP pattern, 8740, for woven fabrics.  I made it from some black denim with 1% Lycra.  Because of the Lycra, I cut XS size.  That's fun to say.  LOL.  I'm not extra small anything.  I had to add 1 inch to the upper back seam since I have more booty than pattern companies design for.  Other than that, they were very easy with an elastic waistline.  I did change the elastic installation though; I zigzagged the elastic to the waistline edge and turned it under to stitch down instead of making the typical casing.  Too much bulk for me.  I do plan on making several more pairs of these. 

Okay. Back to the current project underway.  I'm using my TNT Simplicity 2339 this time adding a cap sleeve and embroidery on the outside.  There's a switch!  LOL.  I have most everything cut out and am testing embroidery thread colors and designs out on scraps of fabric.  

Here's my fabric for this blouse.  The aqua/purple gingham is from Sawyer Brook and the pretty paisley is from our local quilt shop The Quilt Sampler.


More later with some pictures of the process I go through to actually pick my embroidery designs & colors.

Friday, May 13, 2011

Ugh! Blogger...

Wow...Blogger was down for almost 2 days!  I think that's the longest outage since I've been blogging.  I don't really have much to say but I did want to post a picture of the first lilies to bloom in my garden this year.  They're just lovely and lilies are my favorites. 


Don't you just love Spring?

Monday, May 9, 2011

Blouse Fini!!!!

Done! Done! Done!  LOL.  Can you tell I'm excited?  Well the pulled-thread bullion rose embroidery blouse is complete.  That's a mouthful; say that 3 times really fast.  LOL.  I'm pretty pleased with how nice its turned out.  I know its not really a summer color, but I love black and really don't get to wear much of it because of the cats.  Too much cat hair.  LOL.   I'm happy with the integration of 2 heirloom techniques into a blouse I'm going to love wearing.  Here are a couple of pics.

Remember you can click on the picture to get a larger image.  Below is a closeup of the bullion roses hand embroidered into the buttons.


I haven't decided what my next project is but I do need some summer capri's to wear.  I'll have to take a look at what's in the stash and make a decision.

More later...

Sunday, May 8, 2011

Happy Mother's Day!!!

I'd like to wish everyone Happy Mother's Day!  Its a beautiful day outside and I picked strawberries from the backyard this morning.  I'm planning on turning them into a quick batch of preserves. Its just enough for 2 people.  This is the first year they've really borne much fruit and they taste wonderful.

Yumm!

Monday, May 2, 2011

Embroidered Buttonhole Tutorial

I'm not sure I've mentioned it yet, maybe just in passing, but I embroider most of my buttonholes on the garments I make.  I love my sewing machines (Babylock) but I don't think the sewn buttonhole is as nice looking as the embroidered one.  In my Sleeveless Blouse class, I'm teaching the embroidered buttonhole so I thought I would show it to you all too.  The silk blouse I'm making is complete except for the buttonholes and buttons.  I need more silk floss from Silvia (Delicate Stitches) to hand embroider bullion rose buds in attaching the buttons.  Can you believe I used a whopping 5.5 yards of floss to do the pulled-thread replacement on just the collars, one front band and the pocket?  LOL. 

Here are a couple of things to take into consideration when embroidering buttonholes:
  • The size & thickness of the button - buttonholes need to be at least 1/8" larger than the button
  • What type thread you'll be using - I typically use the same thread for buttonholes that I use in construction of the garment - this could change depending on what effect you're trying to create
  • Orientation - horizontal or vertical buttonhole
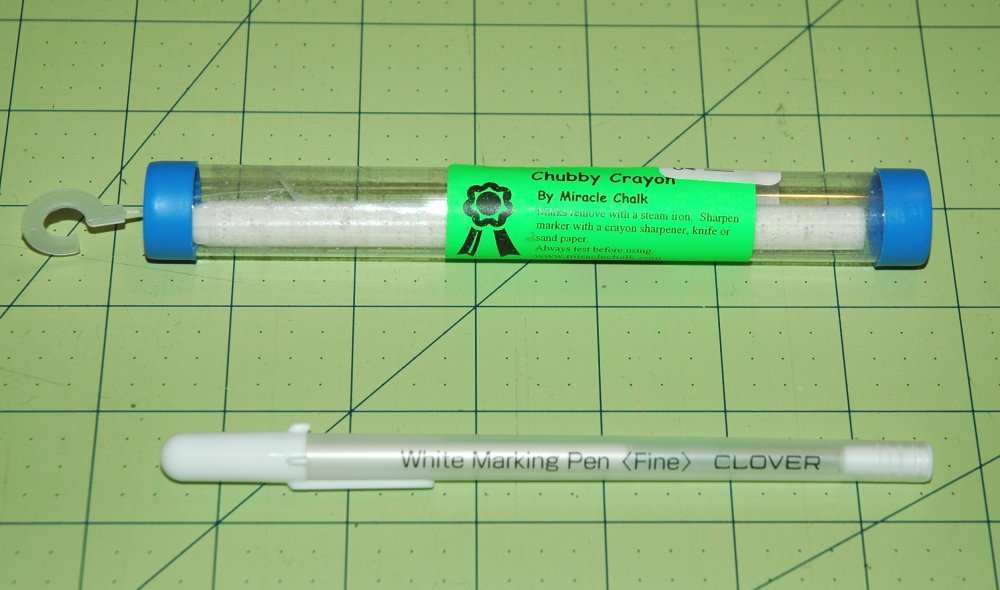
    First thing you do is figure out where and how many buttonholes you need on your shirt.  Mark them somehow.  Since this blouse is black, I'm using a neat product from Clover, called Fine White Marking Pen.  This is pretty unique in the fact it shows up on dark fabrics and it irons off.  Pretty cool, right?  LOL.  I have 2 different versions; the fine and another by Miracle Chalk called the Chubby Crayon.  Both pictured below.


    If you are talented and have the software, you can digitize your own buttonhole.  Alas, that's not me.  LOL.  So I purchased one from Embroidery Library.  Just do a search on buttonholes and up they'll come.  I believe I only spent a dollar on mine.  And you should only need one.  I chose the 5/8" and have the software to re-size the buttonhole to suit my needs. Now I'm not going to get into re-sizing; everyone has different software and I'm only familiar with Designer's Gallery.   Once you have your buttonhole, size it larger than your buttonhole.  Load it on your stick and get ready to run a test of the size.

    I use a light tearaway stabilizer for buttonholes.  In this case, I'll be using black.  Make sure you're button will go through the test buttonhole easily.  There's nothing more exasperating than to make buttonholes where you have to struggle to get them fastened.

    Now for the real thing!  LOL.  Using a 5X7 hoop, I can embroider 3 to 4 buttonholes in one hooping.  Draw a line on the stabilizer a little off center.  This line is where you will position the edge of your blouse to embroider.   The nice thing about it is that I can carefully remove the blouse from the tearaway and reposition the blouse on the same piece of stabilizer to finish the rest of the buttonholes.  

    Here is a pic of the hoop with the line drawn.


    Now a pic of the hoop with the blouse front band lined up with the drawn line and pinned in place.  Now all you have to do is embroider the buttonhole then move to the next spot; repeat until they are all done.


    All of the buttonholes are complete and here's a look at the completed buttonholes.


    Nice looking, eh?  LOL.  Next is a pic of the front of the blouse.


    I had to lighten the pictures in a major way to get this to show up.  Only the buttons left to go.  I'll post pictures of the completed blouse later in the week.

    Belinda