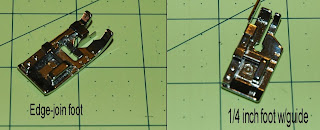
I make use of 2 extra feet purchased, beside the ones that came with my Babylock machines, the edge-join foot and the quarter-inch foot with guide.
Using the edge-join foot to perform any edge stitching works wonders on straightening out a jiggly straight line. Then using the quarter-inch foot to sew to top stitch is easy peasy! These are the most used feet in my collection.
Here's a picture of the beautiful top-stitching you can achieve by using these feet. Sorry its not any brighter; I took the picture last night.
Now I had the bright idea of removing some of the flanges on each foot that allows you to make such a pretty straight stitch so I could navigate convex and concave curves that happens on occasion with garment making. I have a very handy husband who loves to use his Dremel tool with the itty bitty saw. LOL. He removed the portion of the flange on each foot and made the cut edge smooth so there would be no burrs to catch the fabric as it went by.
So when parts of the flange were removed, this is what they should look like when you're done.
The top foot is the edge-join foot with the extension of the flange removed. The bottom is the original foot. If you look closely, you'll see how much has been removed. As always, you can click on the picture for a larger view. Now for the quarter-inch foot.
Its much easier to see the change in this foot. The original, unaltered foot is pictured at the top and the foot with the flange removed is at the bottom. Not much of a difference but it certainly helps make those convex curves easier to navigate and create beautiful stitching. Purchase an extra of each foot; they are relatively inexpensive now that Babylock/Brother have lowered the price to $14.99. I got mine when my dealer had a 40% off foot sale.
Here's an example of a curve using the altered edge-join foot.
Later...


And here I thought I was the only one who had her husband modify sewing machine feet. Notably my free-motion/darning foot from a ring to open toed.
ReplyDeleteTee hee! Like minds!
ReplyDelete