Monday, April 30, 2012

A Recap and some progress

To sum up what I've done so far to the 50th wedding outfit:  3 muslin's to get the fit right on the shell, the purchase of an extra 2 yards of Dupioni (a good thing too), the purchase of waxed tracing paper, enlisted Claire's help in fitting the pants and now I've started making the couture shell. 

In the above picture, I have my silk organza laid out with the pattern pinned onto it and it is lying atop white waxed tracing paper held down with pattern weights.  I traced all of the seam lines, marked all the dots, etc.  When one side was complete, I removed the pattern, turned it over and traced the other side using the lines on the organza.  Two of my pieces didn't have seams lines printed on them so I had to mark them myself.


With the waxed tracing complete for all the pieces (4), I then pinned each piece to my Dupioni.

The next step is tracing by thread all of the seam lines.  This process marries the two fabrics into one and you treat it as one hereafter.  I have a number of these to complete but I hope to get them all done today.  Keep your fingers crossed.  LOL.

Tuesday, April 24, 2012

Do the Limbo...

While I'm waiting for my waxed tracing paper (& some sew-in hair canvas) order to arrive, I'm thought I would write about how I'm going to tackle making the shell for my outfit now that I have it fitted to my satisfaction.  I'm taking the on-line course on Craftsy by Susan Khalje called the Couture Dress.  And I thought I remembered an article in the Threads Archive that mirrored the class except it was for a shell.  So I found in issue  #125 a master class by Susan Khalje called "Eliminate separate facings for elegant edges - A lining technique goes couture".  The shell is a smaller project and I think I have plenty of time to make it using couture methods.  My fabric, as you've seen, is a dusky purple Dupioni.  It's recommended to use silk organza to underline and I have purchased some purple Bemburg for my lining. 

Sooo, to put it in a nutshell, I'll be cutting out my fashion fabric with an increased seam allowance of 1 to 1 1/2 inches.  Using the tracing paper, I'll transfer all of the pattern markings from my pattern to the underlining.  Basting the fabric and underlining together, they will then be treated as the fashion-fabric unit.  I'll sew all the seams, pressing the allowances open and catch-stitching them down.  Staystitch the curved openings, Press the staystitched openings having the stitching fall just inside the neck and arm edges to keep it hidden from the right side.  Then clip and tack the seam allowances to the underlining.  Construct the lining.  Then apply the lining by hand with fell stitches.  And the last couture step will be to understitch the edges with a prickstitch.  And, of course, I'll try to document my steps for you as I go along with the project.

So - what do you think?  LOL.  Am I crazy?


Monday, April 16, 2012

Muslin # 3

I think the fit is just about right.  I added a bit to each of the back pattern pieces by splitting the pattern down the middle and guesstimating.  LOL.  Did you know that guesstimating's a sniglet? You don't hear that anymore.

Here's how the fit looks.


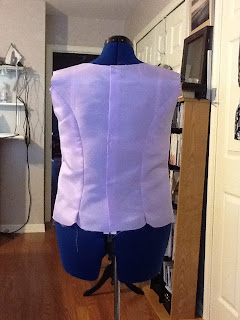
That little bit of wrinkling comes from not snipping the underarm allowance.  And here's the back.
Much better don't you think?
I'll be working on the pants muslin this week with Claire and then I should be able to tackle the fashion fabric and get this project done!

Oh and I spent yesterday afternoon creating these fabric labels with my embroidery machine and its related software.  I'm going to go out to find a lighter color grosgrain ribbon for lighter colored fabrics.  I'll be attaching these on all the new garments I make.  
 Like me; a little fun and a little heirloom with bullion roses. LOL.

Saturday, April 14, 2012

Breaking News!!!

We interrupt this telecast for breaking news!  LOL.  I just had to share a really nice piece of good news.  I'll give you a little background first.  I'm on the Palmer/Pletsch newsletter list.  Late last year they announced a contest looking for entrants who had made a garment from one of their patterns.  Well, it just so happens I finished an embroidered wool jacket from M5984 which I detailed here on my blog.  I entered in December and then promptly forgot all about it.  I didn't even tell anyone but Alan.  Then in February we received the newsletter that announced the winners.  I believe there were 83 or 85 contestants from all over the country.  I didn't expect to win.  I didn't win.  The top 3 winners are absolutely gorgeous!  My talents are modest at best so I didn't expect to do well in a national contest.  So I forgot all about it again.

Then I received this months newsletter.  LO AND BEHOLD!  My jacket made the top 5 as an honorable mention!!!!!  Talk about make my day.  LOL.  Picture me dancing!

If you want to take a look, here's a link to the newsletter.  http://palmerpletsch.com/fashion-from-real-people/fashionFROMrealpeople-Issue2.pdf

My jacket is the 4th featured in the newsletter and they even mentioned my blog!

I have finished my third and final muslin for the shell and I'm happy with it.  But that post will be done tomorrow.

That's all for today.

Tuesday, April 10, 2012

Muslin #2

Just so you don't think I'm nuts, LOL, here's a picture of the pattern pieces lined up with notches and dots matched.  It really is off.

So...I don't know if this is a mistake or what but its something to be aware of when you make this top.  Okay; now on with the rest of the show.  Remember, the camera adds 10 or 20 pounds, right?  LOL. 


The front doesn't really look too bad.  Just a little bit of wrinkles at the sides.  This is still a straight size 16 with only the bust point dropped 1 inch and 1/2 inch added to the 2 front pieces (you can the see 1/2 inch addition in the picture above).


Here I see wrinkles in the back.  


Ugh!  I'm listing!  It looks like the tower of Pisa.  You'd think Alan would have enough presence of mind to tell me to straighten up.  Sigh.

Alright...I had Alan pin the shell closed at the center back marks.  It's too tight.  Guess I need to add a bit.  LOL.

What do you think?

Sunday, April 8, 2012

Muslin #1 - Shell

I should mention, I really don't care for the shell on V2779, so I decided to use a Palmer/Pletsch pattern 2818.
I'll make the one in the lower left corner with the scalloped hem.  This particular pattern uses facings but I'll change that to a lining.  It also buttons in the back.  Sorry no pictures of the shell on me this time.  Alan wasn't available.  Maybe with Muslin #2.  And there will be a second muslin.  LOL.  Actually the first wasn't too bad.  Also, as usual, I'll be adding a inch at the side seams for my hips.  But the first and only change I made before cutting out the pattern was to drop the bust point 1 inch.  The girls just aren't as perky as they were.  LOL.  Take note of the purple fabric the pattern pieces are on.  This is some really cheap poly with the look of dupioni.  I have about 3 yards of it and it took less than one yard to cut out the four pieces of this shell.
Here's the front.  Ignore the terrible ironing job I did.  Plus this stuff wrinkles if you blow on it.  You'll notice there is a tiny tuck taken at the neckline.  When I had it on, it needed the tuck.  But the drop of one inch worked out nicely in the way it fit me.  
And the back.  I can't pin/button it all the way down because there isn't enough room.  I'll split the center back pieces to add a bit more.  Not too bad though.

Now this is just weird.  Do you see how the hemline seems to curve up in front?  Believe or not the pattern does that!  So I took the bull by the horns and added a bit to the side front and front pieces.  

I'm ready to cut out my second try but I thought you all might like to see the progress I've made.

Later!

Tuesday, April 3, 2012

Chiffon Jacket - Complete!

Thank God!  LOL.  It's going to be fun to wear but I'm so thankful I don't have to sew the whole outfit out of this fabric.  Here a few shots.


I really love how it's turned out.  Next, I'll be starting the muslin's for the top and pants.  The Dupioni should be so much easier to sew!  LOL.

I'm off to have a much deserved cuppa'.

Sunday, April 1, 2012

Quick Update - Chiffon Jacket

It's been totally nuts around here.  LOL.  I've attended a 2 day Heirloom workshop taught by Cindy Foose and brought in by our guild.  Worked in the yard trying to cleanup a bit for spring (the roses fought back), taught on Wednesday and yes, I've actually sewn a bit too.  I've finished up the hand-rolled hem on the jacket & sleeves and am thinking about the sleeve installation.  I don't have enough experience to do a french seam in-the-round so I've been casting around on the internet for another method.  I found a tutorial on Paco Paralto's blog on finishing sheer fabrics.  I'll show a little more detail on what I've done as time allows.

That's all for today.