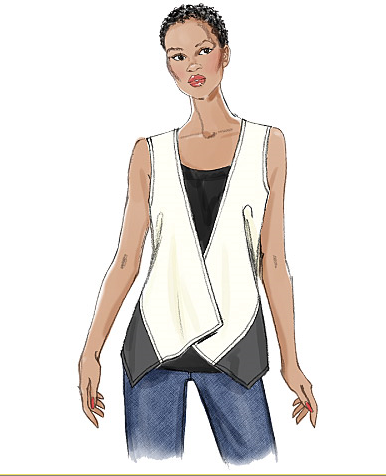
This is a very easy Vogue pattern. And I do think it's pretty easy...except for one thing. You deal with a lot of bias edges. I was very careful and I still had a few issues with stretch. If you are careful, you'll do fine. But if this was made by someone new to sewing, they could have lots of problems with pieces no longer fitting together because of the bias stretching. That said, it's a nice vest. And, here's another caveat - you need a waist dart in this vest if you are a C cup and up. If you don't put one in, it looks like a bag hanging off your front. LOL. If you read my previous posts & looked at the pictures while muslin fitting the pattern, you'll agree with me. It looks so much better with a little bit of shaping. So here are a few pictures.
I have the front pinned closed. I think it hangs and looks better this way. I really hate floppy things. LOL. I walked around the house with it on and it just flapped all over. So NOT going to happen with this girl. LOL. So the vest is done except for a finding the right button. I'll probably run over to the Cloth Merchants and check out what they have available after I check out my stash.
Here's the lining. I got super lucky; JoAnn's had Ambiance lining in the 2 colors I was using and they matched! Can you believe it? It'll never happen again. LOL. If you look at the picture closer, you'll see I did a machine feather stitch to the grey lining edge. I thought it looked nice.
Showing posts with label Vogue8713. Show all posts
Sunday, January 22, 2012
Sunday, January 15, 2012
Embroidery progress
I now have a few pictures of the first piece of embroidered fabric and a little explanation of what it took to get there. This piece shows an arrow with the grain of the fabric and a chalk drawing of the outline of my pattern piece. This particular piece is the right front of the peplum.
Here I've shown marked cross hairs of the design placement.
This is the completed embroidery. I use Designer's Gallery Customworks II to edit the designs. This program gives you tons of flexibility in altering and combining designs. If you're interested, the designs I used, were purchased from OESD design set #12281. It's a set of about 30 single designs that you combine in a layout that's pleasing to you. This is the second time I've used this set. It took two hoopings to fill the chalked outline. These designs are mostly simple bean stitch (or triple stitch) with a tiny bit of satin stitch thrown in. I used one layer of Sulky's Tear Easy a soft, lightweight, tear-away stabilizer. I also use Madeira Rayon embroidery thread. I have a huge collection of it since I've been purchasing it for over 20 years.
You'll notice some of my embroidery crosses the chalked lines. No big deal. These are the cutting lines. What you do need to pay attention to is the seam line which is 5/8" in from the cut line. Pay particular attention to removing all of the stabilizer from the seam lines that have embroidery encroaching into them. If you don't remove it, you'll have a really thick, stiff seam and it could affect the hang of garment when complete.
I'm working on the left front now. There's only the back peplum to complete.
That's all for today!
Tuesday, January 10, 2012
It's good to have friends...
I was whining about my issues with the vest on Facebook with Claire Kennedy and she came up with the perfect solution for this vest. She suggested a waist dart. Slap me on the forehead! LOL. It's a great solution and doesn't destroy the lines of the garment while giving it a gentle shaping. Wow. I'm going to be so much happier with it now. You just establish your bustpoint and a couple of inches down draw in a dart stopping just shy of the seamline. Here are pics showing the change to the pattern and then the change in the muslin.
Side view of the dart.
Front View.
Dart drawn out on muslin.
Tracing of the dart to my pattern piece.
Now I think I can happily move onto the embroidery!
Monday, January 9, 2012
Vest...It is what it is
Obviously I'm over thinking this vest. LOL. I went back to the drawing board and cut out a straight size 16 and made it up. Its not bad. I've discovered that making changes destroys the style. So I'm going to make it up right out of the box so to speak. Here are the pictures.
It's really not bad right out of the pattern envelope. There is some armhole gaposis going on and I may try to pinch a tiny dart out of each armhole (shown if you look closely) to reduce that but otherwise, I'm going to leave it alone. If this was a typical vest pattern, I would make the normal changes. But they just don't seem to work with this style.
Now I'm going to iron fabric and start testing out embroider designs and thread colors. Should be fun! I love this part. LOL.
That's all for today!
It's really not bad right out of the pattern envelope. There is some armhole gaposis going on and I may try to pinch a tiny dart out of each armhole (shown if you look closely) to reduce that but otherwise, I'm going to leave it alone. If this was a typical vest pattern, I would make the normal changes. But they just don't seem to work with this style.
Now I'm going to iron fabric and start testing out embroider designs and thread colors. Should be fun! I love this part. LOL.
That's all for today!
Sunday, January 8, 2012
V8713 Muslin
So far, I'm not impressed. I think I really to need to do a FBA before I can evaluate the look of this pattern objectively.
I've pinned out 7/8" out narrowing down to nothing at the peplum seam. Inside the pinned out piece is the 5/8" seam first sewn.
Ah, here is the really ugly front view. GAH! I'm not sure this will be a successful look for me.
Talk about Madonna in her glory days!
The left side has been pinned with the smaller side seam. Right is unaltered.
Now off to make that FBA!
Saturday, January 7, 2012
Project Vest
I'm starting a new project. This very, easy Vogue pattern 8713 will be a class I'll teach at B-Sew Inn. We'll be making view A and I'm making mine out of two colors of linen I ordered from Fabrics-store.com. I've washed and dried my linen and its awaiting pressing on the ironing board.
I really like the look of the vest and in the back it looks to have a little flounce. I really don't do well with a bigger anything in the "back" since I'm a pear shape. So I planned on taking the flounce away.
See? A Flounce. Minimal to be sure, but still more than you need when you have too much booty. LOL.
So far I have my pieces cut out. I started with a 16 (the smallest size in this pattern envelope) at the shoulder, neck and armhole area. Then I cut an 18 for the side seams. I made a quick tissue fit against Ruby and it looks longer than usual so only added 1 inch in length on the front and back pieces.
The following pictures I took with my iPad2 instead of my Nikon. I thought "what the heck"? LOL. This is a side shot where you can see the one inch in length I added both front and back. It actually brought the top of the flounce down to my waist in the back and sides. And look at the flounce. It's really not much of one is it? It actually just seems to skim the body with no real extra material. I'm liking it! Its a slimming look.
Here's the back view. Okay, this is no where near to covering my a**. See the red arrow? It's pointing to a white dot, which is a straight pin. That's where I usually like tops to end. I'm going to have to make an actual muslin and take a photo of it to make sure this will look alright to me. Otherwise, I might be adding a couple of inches to the back. We'll see how it goes. And yes I know that's more like 6 inches in the picture but we may be talking compromise here. LOL.
Now to analyzing the front view. Not bad. I haven't put in a FBA yet. I want to see what this will look like first in a muslin before I make that change. If you look at the pattern drawing, you'll see the fronts overlap. You know what? I'll just bet that's going to flap around and drive me nuts. LOL. I might have to have a large, decorative button. But that decision can wait until I'm done.
The pattern says this is a close-fitting vest. It's looking like I can take a good inch out of the side seams. I'll be checking that in the muslin too.
I really want this vest pattern to work out since I'd like to make up another out of denim. Vogue shows it made up on the pattern site and it's pretty darn cute.
Well, this is all I have for today. Off to make up the muslin and report back.
Subscribe to:
Posts (Atom)